

A Homeowner’s Guide to Replacing a Garbage Disposal
Your garbage disposal can be a very effective tool for breaking down food particles to get them safely down your plumbing. However, most garbage disposals are rated for 10 years. Therefore, most homeowners will end up having to replace them multiple times throughout their lifetime.
Common Signs That Your Garbage Disposal Needs to Be Replaced
While it’s likely that your garbage disposal will experience a few issues over its lifetime, there are some key signs that will indicate that it’s time to think about replacing the unit entirely. These include when:
- It constantly resets
- It won’t deodorize
- Its blades won’t chop effectively
- It has a leak on its bottom
- It has physical damage like a cracked housing
- It gets clogged frequently
When you determine that it’s probably time to replace your garbage disposal, you have a few different options on the market to choose from. It’s a good idea to take a moment and assess how well your previous garbage disposal met your needs. Did you have issues with constant clogs? Did it feel like the motor wasn’t powerful enough to handle your needs?
When you go to purchase a new garbage disposal, it may be time to consider purchasing one that has more horsepower. If the sound of your garbage disposal working is way too noisy for your ears, you may want to spend a little extra money and invest in one that has an insulated chamber. Other options include a corrosion protection shield, anti-splash baffles, and even sound baffles.
Starting the Removal Process
You’ll want to start by turning off the power to your garbage disposal. Leaving it on can lead to an accidental electrical hazard. Start by removing the drain tube and the dishwasher drain tube, if you have one. These are typically held on by metal clamps that require you to unscrew them to loosen them up.
When you go to remove your garbage disposal, it will drop down quickly. While it doesn’t weigh a ton, it still weighs a hefty 15 pounds. This can be difficult to catch as it falls. Do yourself a favor and create a support with wood or something sturdy to hold your garbage disposal as you loosen its attachments.
Turn It Counterclockwise
Your garbage disposal is held in position by a mounting bracket attached under your sink. You’ll want to stick a screwdriver in one of the loops for the bracket and turn it counterclockwise. You may have to use some force to break it loose. Once the bracket is fully loose, your garbage disposal will fall right out. This is where having that makeshift support will come in handy.
Once your garbage disposal is free of the mounting bracket, you’ll want to disconnect its electrical connections. Most will have a faceplate on the bottom that needs to be unscrewed to give you access to the electrical components. You can use needle-nose pliers to pull the wiring clips free of the garbage disposal. Make sure that you use a screwdriver to loosen the grounding screw and pull off the copper ground wire.
Reseal Your Drain
While you have your old garbage disposal out, it’s a good time to reseal the drain to your sink to prevent it from leaking for another 10 years. You will need to remove the existing mounting bracket and push the drain up into the sink. Scrape off all of the old putty that is underneath the drain so that you have a clear surface for good adhesion.
Next, take a new roll of plumber’s putty and apply it to the underside lip of your sink drain. Push down until the drain is fully in place, and use something heavy, such as your old garbage disposal, as a weight to hold the drain in place until the putty dries up. Once dry, you can go ahead and put your mounting bracket back into place.
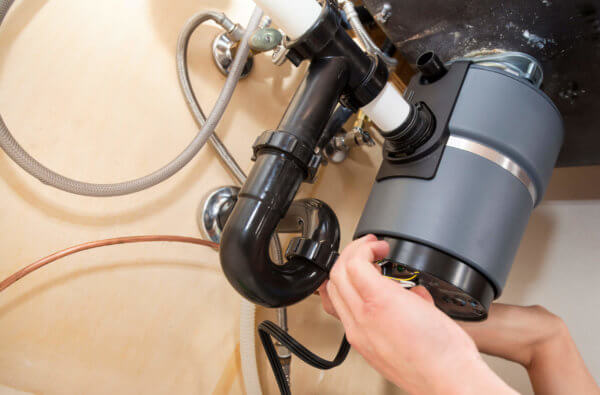
Put in the New Garbage Disposal
Get your new garbage disposal and remove its faceplate. You’ll want to connect the grounding wire to the grounding screw and the other wires to their necessary locations. If you’re not sure where each wire connects to, ensure that you consult the instructions that came along with your unit. Hooking up the wires backward can actually lead to damage to your new unit.
Once all of your wiring is hooked up to your new garbage disposal, it’s time to put it into your mounting bracket. Be sure to twist the bracket in a clockwise direction this time to tighten up the bracket. Lastly, you’ll want to reattach the drain tubes. If you don’t have a dishwasher drain tube, make sure that you leave the plastic plug in the disposal. Once everything is hooked up, go ahead and turn on your power to ensure that your new garbage disposal works correctly.
Helpful Tips to Keep Your New Garbage Disposal in Great Condition
Your garbage disposal is something that you need to be running on a regular basis. If you don’t run it, the blades will start to rust and create a whole world of problems. Do yourself a favor and make it a habit to turn your garbage disposal on at least once per day. If you don’t have anything to grind up, use ice. Ice works to help sharpen the blades and clean out any excess debris that is stuck inside your garbage disposal.
Be very mindful of what you put down your garbage disposal. Items like banana peels, celery, potato peels, cornhusks, coffee grounds, eggshells, and, of course, silverware should never be put down your garbage disposal. Hard items can wear out your blades prematurely or even cause them to break. Materials like eggshells and coffee grounds aren’t going to damage your unit, but they do tend to increase your risk of experiencing clogs.
When you’re running your garbage disposal, make sure that you’re running water down it. Water helps to allow the food particles to move around and assists the blades in doing their job correctly. Let the drain run for a few minutes after you run your disposal to allow any food particles to make their way down your drain very quickly.
Lastly, you’ll want to make it a habit to clean out your garbage disposal every two weeks. You can easily do this by adding ice to your garbage disposal along with some rock salt. These work as abrasive surfaces to sharpen the blades and make sure that it washes down any excess food particles. You’ll want to let your garbage disposal run for a full minute to ensure that all of the ice makes its way through. If you’re dealing with any nasty smells, you’ll want to pour a cup of vinegar down your drain alongside a half-cup of baking soda to help neutralize the odor.
Reliable Plumbing Services
While handy homeowners can use this guide to replace their own garbage disposal, it’s always better to turn to a professional plumber for help. A professional will ensure that your disposal is installed correctly and completely safe to use. Professional installation will also ensure that your new unit lasts its entire expected lifespan.
At Crystal Blue Plumbing Heating & Air, we offer reliable Plumbing services, including garbage disposal repair and replacement, for the entire Sacramento region. We can also help with all of your heating, cooling, duct repair and replacement, indoor air quality, heat pump, zone control, thermostat, HRV/EVR, dual fuel system, and commercial needs. Call us today to schedule your next appointment.